Bob MD and Alice MD are physicians running their respective medical practices and both have a database of private medical transcriptions. You own a Natural Language Processing (NLP) company and have been contacted by these physicians because both Bob MD and Alice MD have heard of the high quality of the Machine Learning as a Service (MLaaS) solutions you provide and want you to create a text classifier to help them automatically assign a medical specialty to each new patient text transcription.
Limitations
Healthcare data is highly regulated and should be, for most intents and purposes, private. Therefore, if in a medical setting, the Machine Learning model being trained should not actually look at the data.
Combining both Bob’s and Alice’s datasets, you should be able to create a bigger, better dataset that you could use to train your model with higher accuracy, only that you can’t because it’s all sensitive and private data, which is why you will need PySyft and SyferText to complete the job at hand.
Data exploration
In a secure and private scenario, we would not get access to the full dataset. Instead, we would be given only the files containing the features needed to train our model.
Assuming the owners of the data only shared two features with us:
transcription: The medical transcription text (corpus).
medical_specialty: The medical specialty tagged to the corpus.
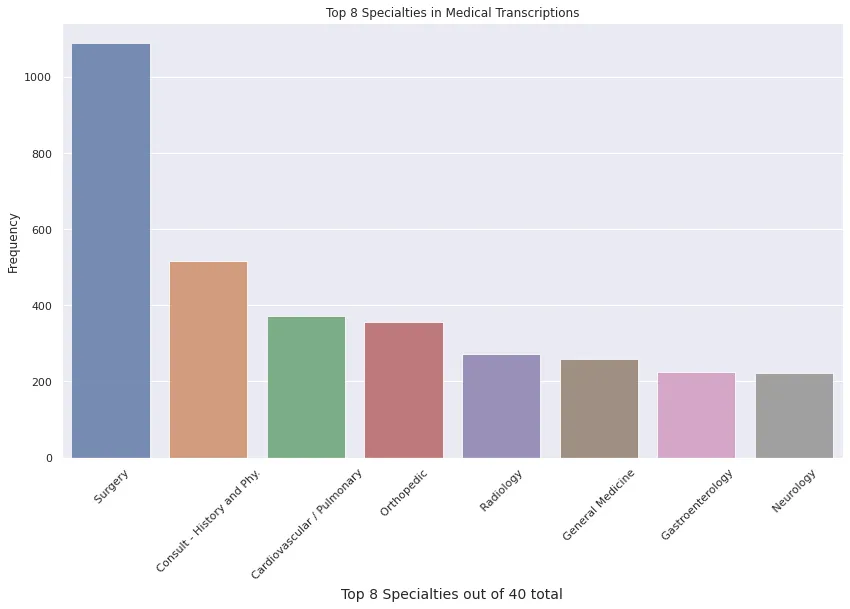
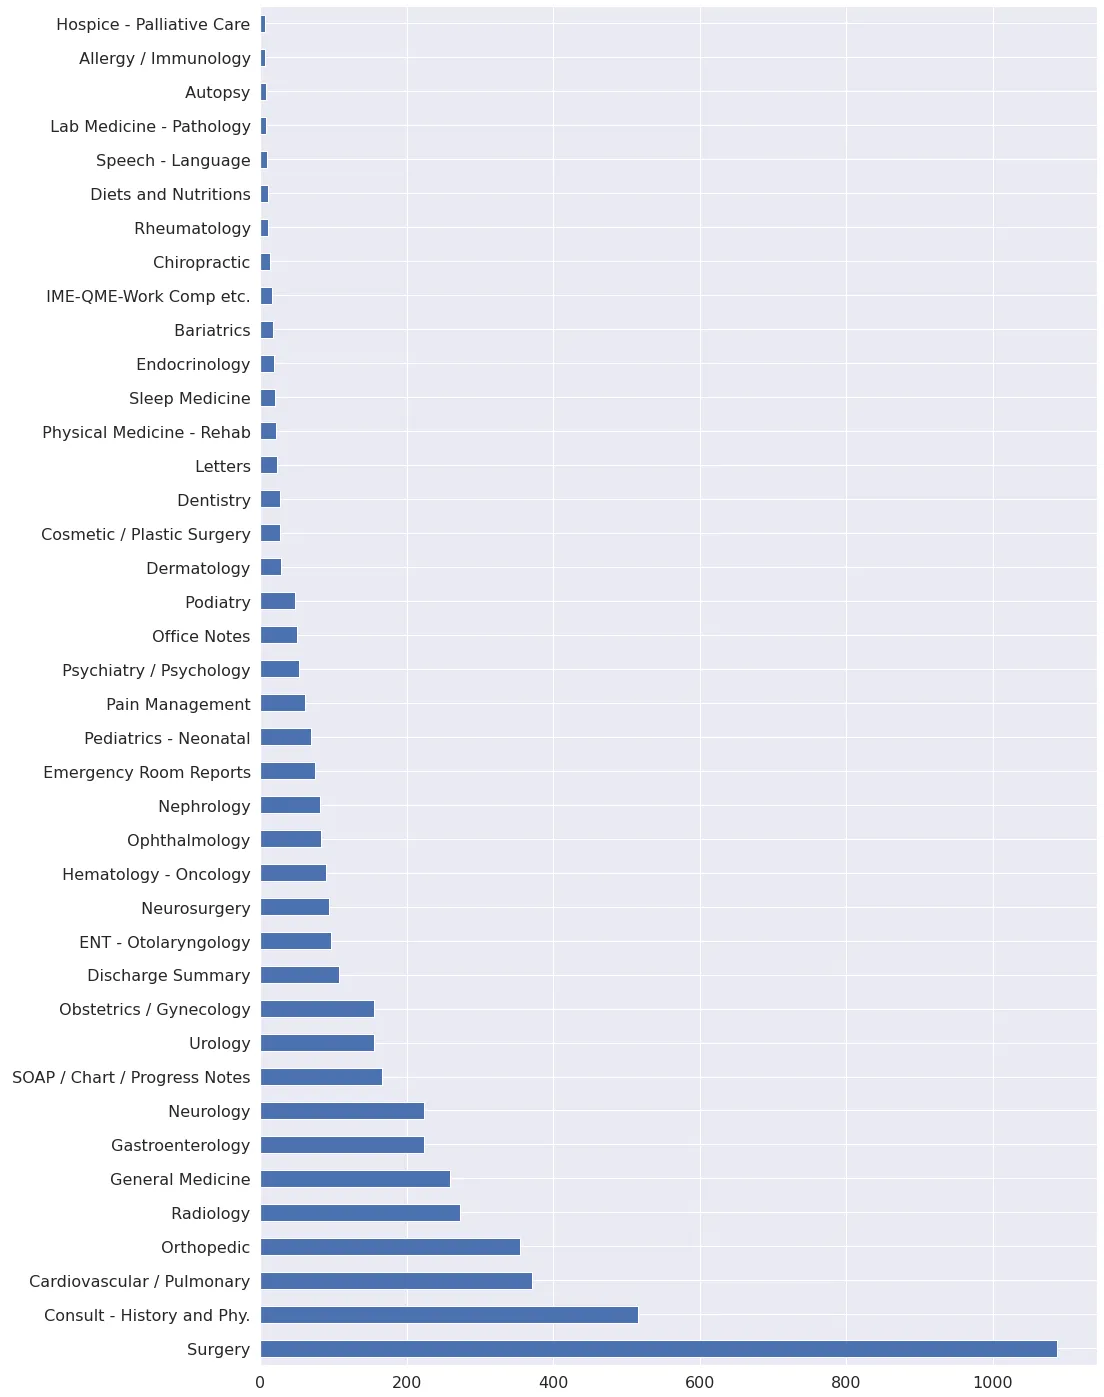
The owners of the data could try to share some insight with us in order to help us design our model. Such insight could be generated from their own data exploration, for instance:
Or, for example:
Looking at the available information, we can determine that a model will produce better classification results as a binary classifier that is able to recognize if the transcription text refers to the medical_specialty of ‘Surgery’. For this experiment, we will assume we went back to the clients with this proposal and it was accepted.
Natural Language Processing helper files
Now that we have the corpus of our data, we still need a stop words file and a vocabulary file. Normally, you would need to generate these on your own but for this and similar experiments, you can download or clone the medical-nlp repo and use the files that are compiled within it.
You may also clone or download the private_nlp repo containing the encrypted training notebook demoed here as well as the aforementioned data exploration notebook where the displayed graphics were conceived. Both repos contain the data needed to replicate this experiment. If you wish, you can still go ahead and download the dataset in the second to next section.
The dataset will be downloaded in a folder called data in the root directory. The files will be downloaded using the download_dataset helper function. Note that you don’t need to download anything if you cloned the original repository:
classes.txt. Text file describing the dataset’s classes: Surgery, Medical Records, Internal Medicine and Other
train.csv. Training data subset. Contains 90% of the X.csv processed file.
test.csv. Test data subset. Contains 10% of the X.csv processed file.
In this part, we assume each client owns a part of the full dataset and we prepare each worker to perform encrypted training.
Virtual environment
If you have not setup PyGrid yet or want to only focus on the training aspect of this demo, run the cell below and skip the next cell.
A work environment is simulated with three main actors, a company (us) and two clients owning two private datasets (Bob and Alice) but also a crypto provider which will provide the primitives for Secure Multi-Party Computation (SMPC).
# Create a torch hook for PySyfthook = sy.TorchHook(torch)# Create some PySyft workersme = hook.local_worker # This is the worker representing the deep learning companybob = sy.VirtualWorker(hook, id = 'bob') # Bob owns the first datasetalice = sy.VirtualWorker(hook, id = 'alice') # Alice owns the second datasetcrypto_provider = sy.VirtualWorker(hook, id = 'crypto_provider') # provides encryption primitive for SMPC
Local PyGrid environment
A local grid work environment can be initialized using PyGrid with three main actors, a company (us) and two clients owning two private datasets (Bob and Alice) but also a crypto provider which will provide the primitives for Secure Multi-Party Computation (SMPC). The implementation would look something like this:
# Set the path to the dataset filedataset_path = '../data/train.csv'# store the dataset as a list of dictionaries# each dictionary has two keys, 'text' and 'label'# the 'text' element is a PySyft String# the 'label' element is an integer with 1 for each surgical specialty and a 0 otherwisedataset_local = []with open(dataset_path, 'r') as dataset_file: # Create a csv reader object reader = csv.DictReader(dataset_file) for elem in reader: # Create one entry # Check if the medical specialty contains 1 (label for surgery) # otherwise mark it as 0" example = dict(text = String(elem['text']), label = 1 if elem['label'] == '1' else 0 ) # add to the local dataset dataset_local.append(example)
Distributing documents privately
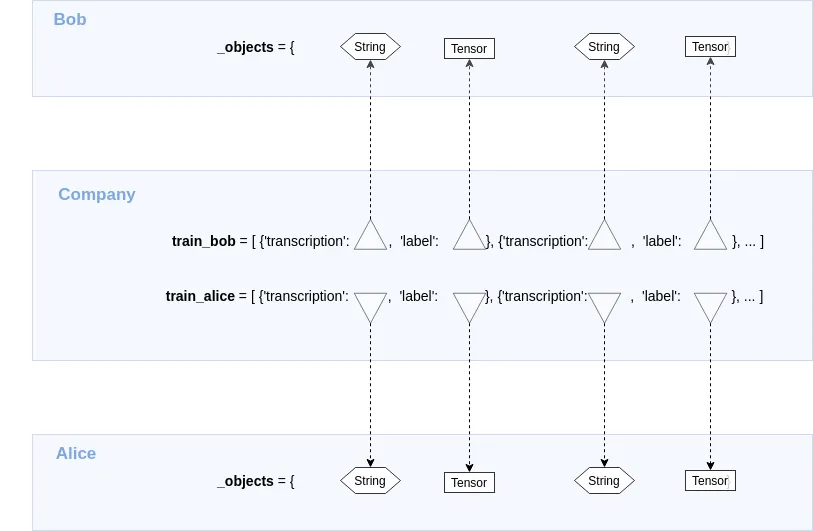
We simulate two private datasets owned by two clients (Bob and Alice):
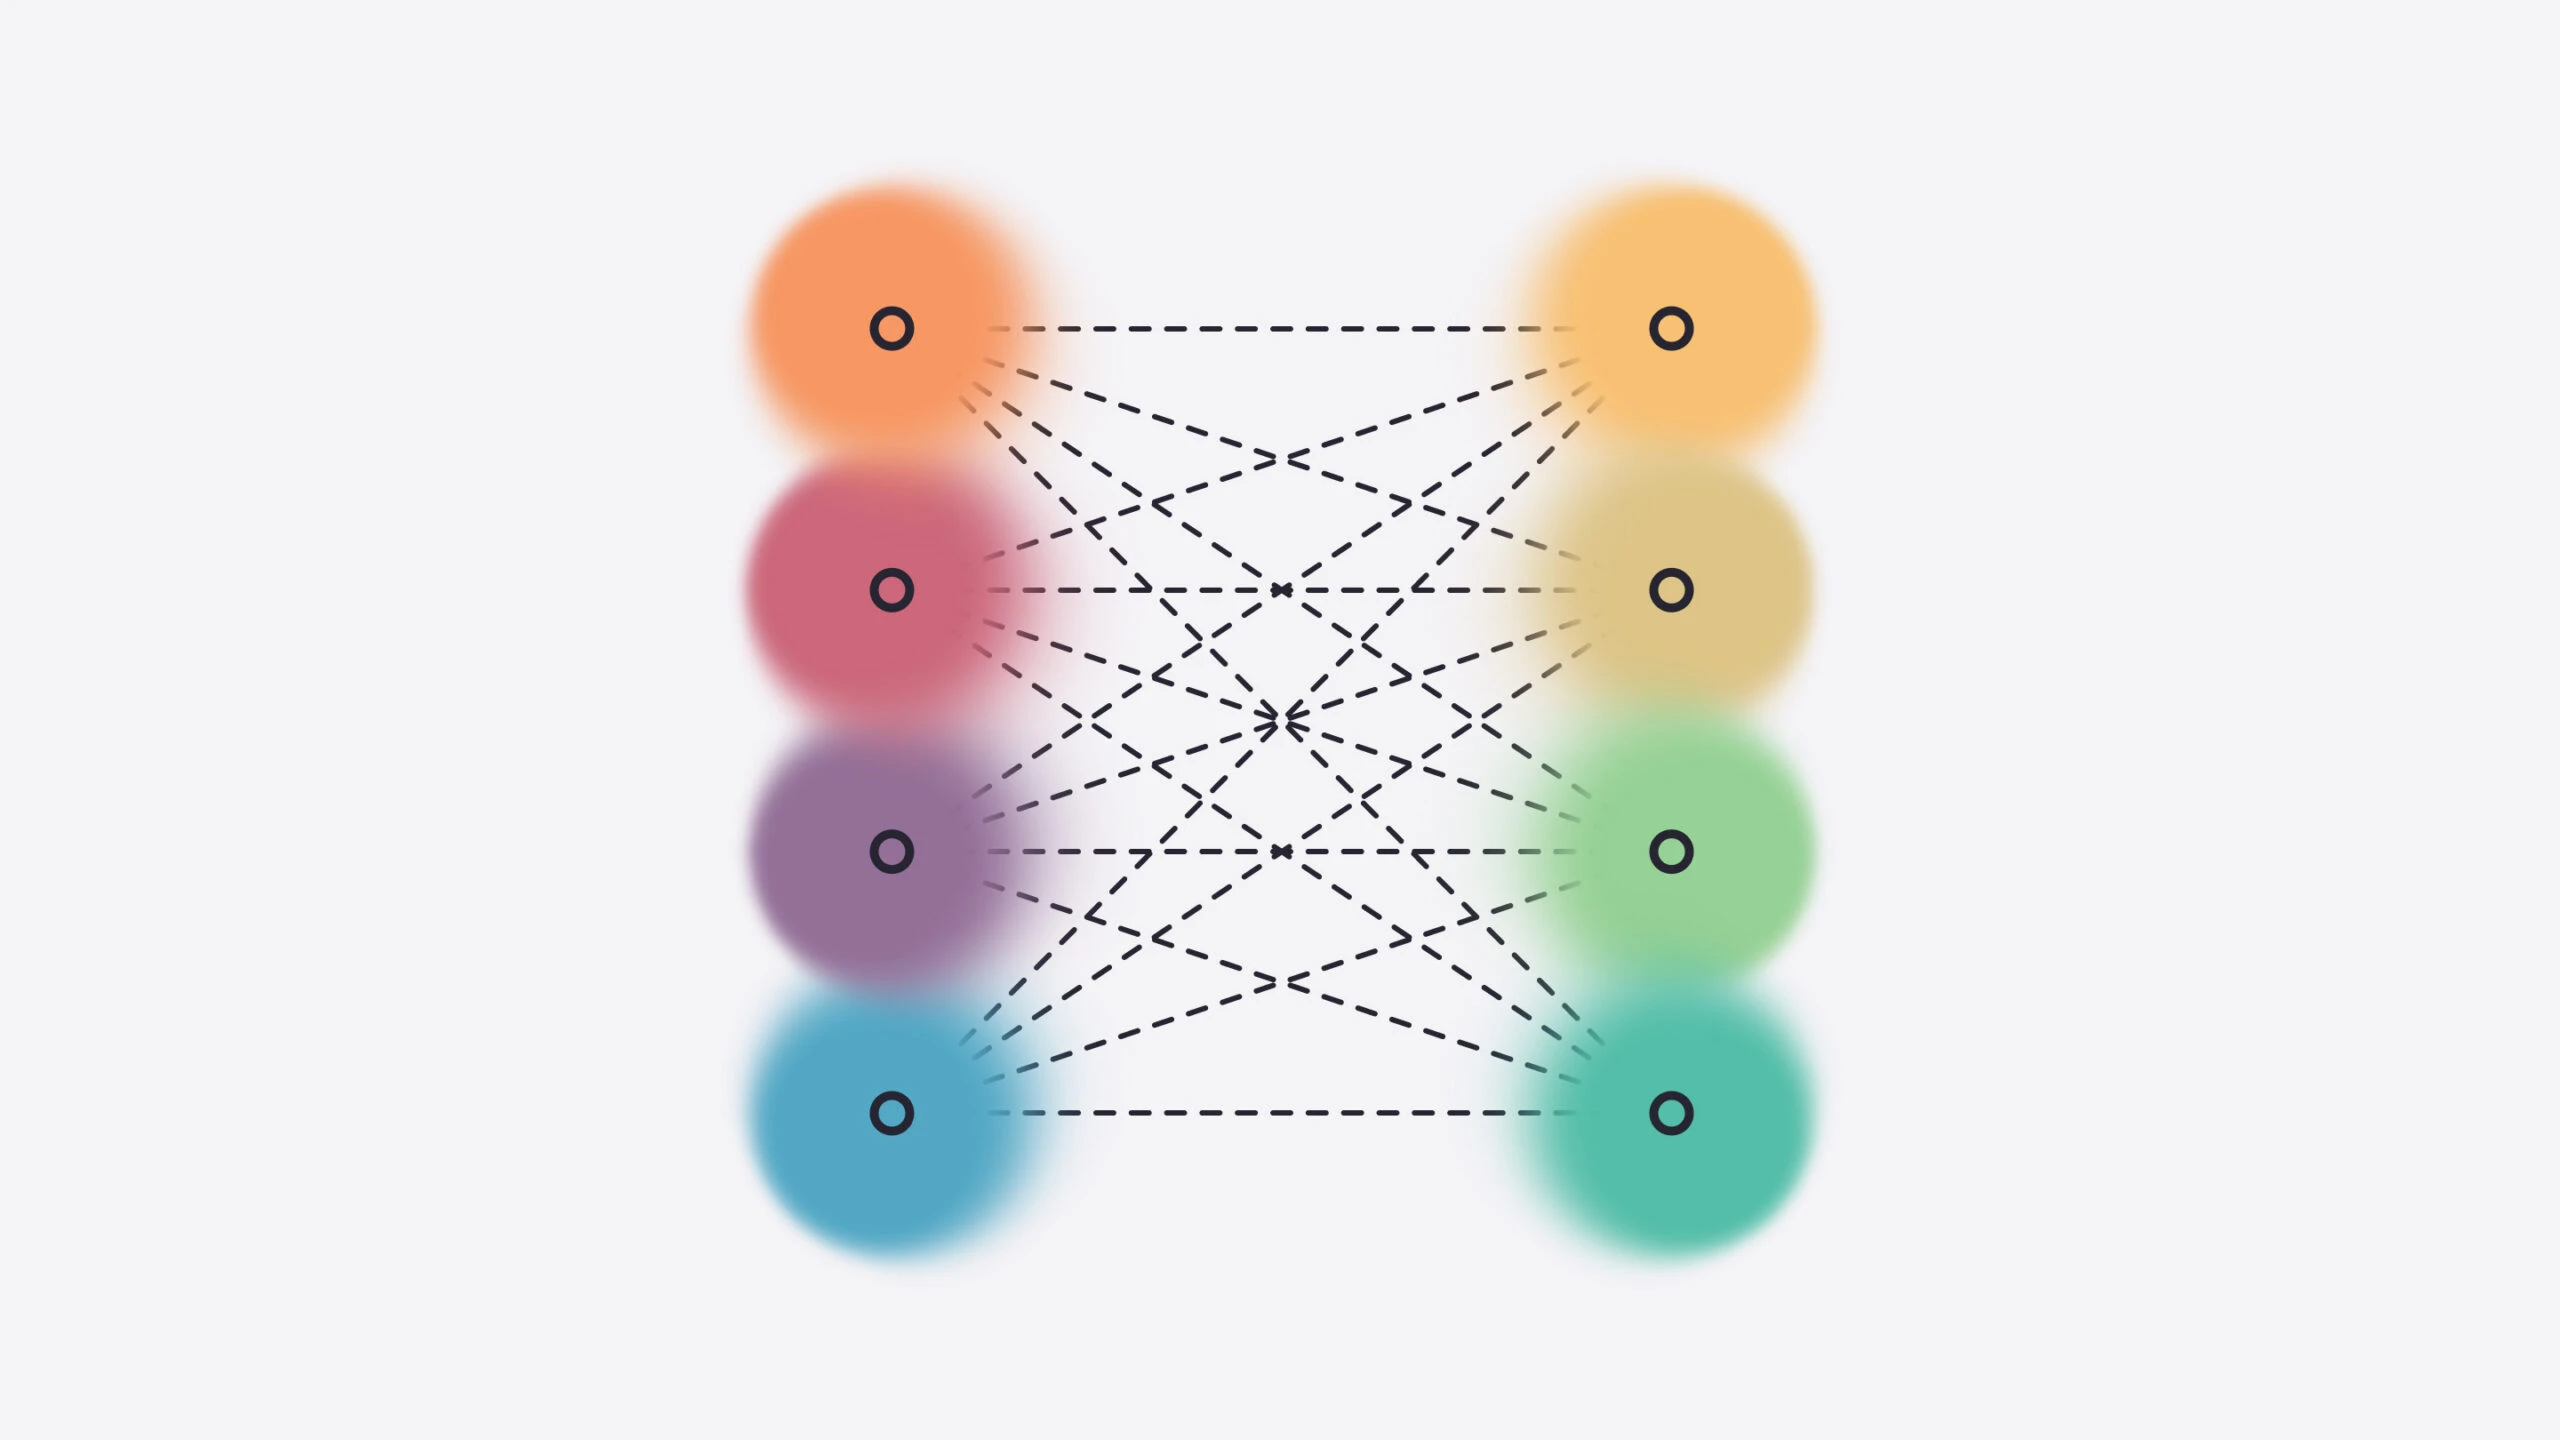
Figure 1: The transcription text and their labels are remotely located in Bob and Alice’s remote worker machines, only pointers to them are kept by the local worker (the company’s machine).
Make a function that sends the content of each split to a remote worker
def make_remote_dataset(dataset, worker):
# Got through each example in the datasetfor example in dataset: # Send each transcription text example['text'] = example['text'].send(worker) # Send each label as a one-hot-encoded vector one_hot_label = torch.zeros(2).scatter(0, torch.Tensor([example['label']]).long(), 1) # print for debugging purposes # print("mapping",example['label']," to ",one_hot_label) # Send the transcription label example['label'] = one_hot_label.send(worker)</code></pre><figcaption>Every label corresponds to a 2-digit tensor of binary values (<code>[1,0]</code> or <code>[0,1]</code></figcaption></figure>
SyferText is OpenMined’s Natural Language Processing tool and we will be using it throughout this demo.
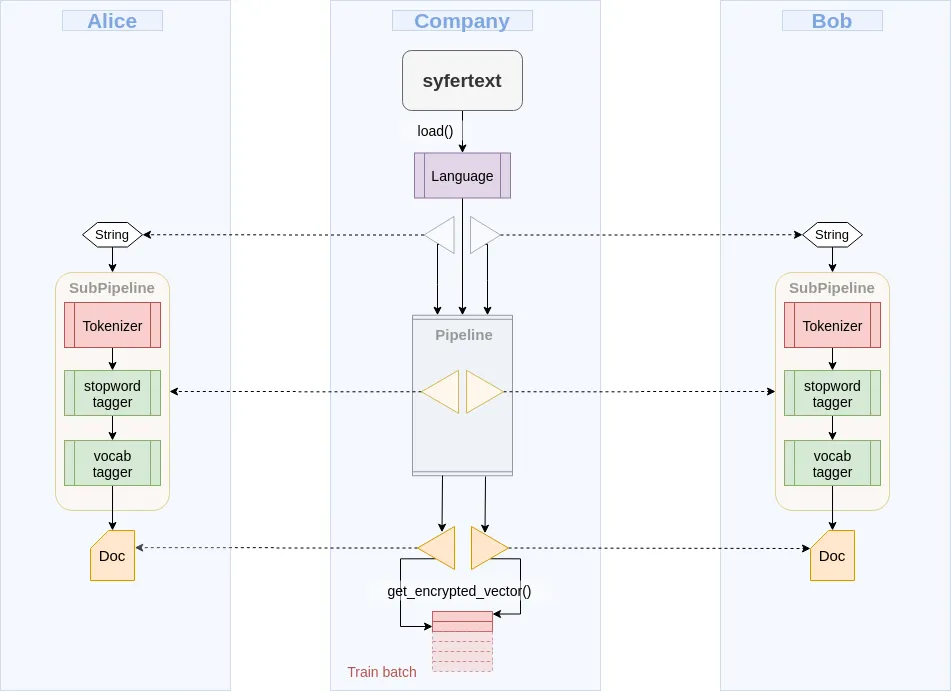
Next, we will create a Language object and a processing pipeline made of three blocks: a tokenizer, a stop words tagger and a vocabulary tagger.
# Create a Language object with SyferText
nlp = syfertext.load('en_core_web_lg', owner = me)
Loading the Web Core Large English language class as a Natural Language Processing object
NLP Pipeline
The nlp object comes loaded with a tokenizer already so next we need to add a stop words tagger and a vocabulary tagger. Stop words tokens will be excluded from the pipeline and the rest of the tokens will be filtered out if not marked as words from the vocabulary file. This pipeline will allow to process the text more efficiently and to assign weights to tokens correlated to the output classes.
use_stop_tagger = Trueuse_vocab_tagger = True# Token with these custom tags# will be excluded from creating# the Doc vectorexcluded_tokens = {}
Stop words tagger
## Load the list of stop wordswith open('../data/clinical-stopwords.txt', 'r') as f: stop_words = set(f.read().splitlines())# Create a simple tagger object to tag stop wordsstop_tagger = SimpleTagger(attribute = 'is_stop', lookups = stop_words, tag = True, default_tag = False, case_sensitive = False )if use_stop_tagger: # Add the stop word to the pipeline nlp.add_pipe(name = 'stop tagger', component = stop_tagger, remote = True ) # Tokens with 'is_stop' = True are # not going to be used when creating the # Doc vector excluded_tokens['is_stop'] = {True}
Vocab words tagger
## Load list of vocab words
with open('../data/vocab.txt', 'r') as f:
vocab_words = f.read().splitlines()
# Add the stop word to the pipelinenlp.add_pipe(name = 'vocab tagger', component = vocab_tagger, remote = True )# Tokens with 'is_vocab' = False are# not going to be used when creating the # Doc vectorexcluded_tokens['is_vocab'] = {False}</code></pre><figcaption>Creating a tagger of the SimpleTagger class</figcaption></figure>
Creating a Dataset class
Now that the datasets are remote and ready along with the Language object and its pipeline we can create PyTorch loaders to make data batches for training and validation.
The batches will be composed of training examples coming from both Bob’s and Alice’s datasets as if it were only one big dataset.
Figure 2: A pipeline on the local worker only contains pointers to subpipelines carrying out the actual preprocessing on remote workers. Figure adapted from SyferText Sentiment Classification
class DatasetMTS(Dataset): def __init__(self, sets, share_workers, crypto_provider, nlp): """Initialize the Dataset object Args: sets (list): A list containing all training OR all validation sets to be used. share_workers (list): A list of workers that will be used to hold the SMPC shares. crypto_provider (worker): A worker that will provide SMPC primitives for encryption. nlp: This is SyferText's Language object containing the preprocessing pipeline. """ self.sets = sets self.crypto_provider = crypto_provider self.workers = share_workers # Create a single dataset unifying all datasets. # A property called `self.dataset` is created # as a result of this call. self._create_dataset() # The language model self.nlp = nlp def __getitem__(self, index): """In this function, preprocessing with SyferText of one transcription will be triggered. Encryption will also be performed and the encrypted vector will be obtained. The encrypted label will be computed too. Args: index (int): This is an integer received by the PyTorch DataLoader. It specifies the index of the example to be fetched. This actually indexes one example in `self.dataset` which pools over examples of all the remote datasets. """ # get the example example = self.dataset[index] # Run the preprocessing pipeline on # the transcription text and get a DocPointer object doc_ptr = self.nlp(example['transcription']) # Get the encrypted vector embedding for the document vector_enc = doc_ptr.get_encrypted_vector(bob, alice, crypto_provider = self.crypto_provider, requires_grad = True, excluded_tokens = excluded_tokens ) # Encrypt the target label label_enc = example['label'].fix_precision().share(bob, alice, crypto_provider = self.crypto_provider, requires_grad = True ).get() return vector_enc, label_enc def __len__(self): """Returns the combined size of all of the remote training/validation sets. """ # The size of the combined datasets return len(self.dataset) def _create_dataset(self): """Create a single list unifying examples from all remote datasets """ # Initialize the dataset self.dataset = [] # populate the dataset list for dataset in self.sets: for example in dataset: self.dataset.append(example) @staticmethod def collate_fn(batch): """The collat_fn method to be used by the PyTorch data loader. """ # Unzip the batch vectors, targets = list(zip(*batch)) # concatenate the vectors vectors = torch.stack(vectors) #concatenate the labels targets = torch.stack(targets) return vectors, targets
Then we instantiate two dataset objects, one for training and one for validation
And we use the __getitem__ method to obtain the embedding vectors
vec_enc, label_enc = trainset.__getitem__(1)
print(f' Training Vector size is {vec_enc.shape[0]}')
Training and Validation Vector size is 300
Training configuration
We will now describe the training hyper-parameters for training and validation and create the PyTorch data loaders:
EMBED_DIM = vec_enc.shape[0]
BATCH_SIZE = 128 # chunks of data to be passed through the network
LEARNING_RATE = 0.001
EPOCHS = 3 # Complete passes of the entire data
NUN_CLASS = 2 # 2 classes since its a binary classifier
Instantiate the DataLoader object for the training set
The classifier we will use is a simple neural network of 3 fully connected layers with 300 input features, which is the size of the embedding vectors computed previously by SyferText. The network is a binary classifier that outputs a label for surgical specialties and another one for every other type of specialty.
Next, we initialize and encrypt the classifier. The encryption here must use the same workers that hold the share and the same primitives used to encrypt the document vectors.
The last thing to do before training is creating an optimizer. The optimizer doesn’t need to be encrypted since it operates separately within each worker holding the classifier and the embeddings’ shares. One thing to note is that the optimizer needs to operate on fixed precision numbers to be able to encode shares.
optimizer = optim.SGD(params = model.parameters(),
lr = LEARNING_RATE, momentum=0.3)
We need to create a summary writer in order to view the training and validation curves for loss and accuracy. Then we will be able to run Tensorboard and see the information.
# Create a summary writer for logging performance with Tensorboardwriter = SummaryWriter()
Next, open or split a terminal, navigate to the folder containing this notebook, and run:
$ tensorboard --logdir runs/
Then open you favorite web browser and go to localhost:6006.
You should now be able to see performance curves.
We are now ready to run the below cell to launch the training. NLLLoss() is not yet implemented in PySyft for SMPC mode so we will use Mean Squared Error (MSE) as a training loss even though is not the best choice for a classification task.
# save losses for debugging/plottingtrain_losses = []train_acc = []train_iter = []val_losses = []val_acc = []val_iter = []for epoch in range(EPOCHS): for iter, (vectors, targets) in enumerate(trainloader): # Set train mode model.train() # Zero out previous gradients optimizer.zero_grad() # Predict sentiment probabilities probs, logits = model(vectors) # Compute loss and accuracy loss = ((probs - targets)**2).sum() # Get the predicted labels preds = probs.argmax(dim=1) targets = targets.argmax(dim=1) # Compute the prediction accuracy accuracy = (preds == targets).sum() accuracy = accuracy.get().float_precision() accuracy = 100 * (accuracy / BATCH_SIZE) # Backpropagate the loss loss.backward() # Update weights optimizer.step() # Decrypt the loss for logging loss = loss.get().float_precision() # get iteration number train_i = 1 + epoch * len(trainloader) + iter # append to training losses for plotting train_losses.append(loss.item()) train_iter.append(train_i) train_acc.append(accuracy) # print progress in training print("epoch:",epoch+1,f'tLoss: {loss:.2f}(train)t|tAcc: {accuracy:.2f}%(train)', train_i) # Log to Tensorboard writer.add_scalar('train/loss', loss, train_i) writer.add_scalar('train/acc', accuracy, train_i) # break if over 100 iterations to save time if train_i>100: break """ Perform validation on exactly one batch """ # Set validation mode model.eval() for vectors, targets in valloader: probs, logits = model(vectors) loss = ((probs - targets)**2).sum() preds = probs.argmax(dim=1) targets = targets.argmax(dim=1) accuracy = preds.eq(targets).sum() accuracy = accuracy.get().float_precision() accuracy = 100 * (accuracy / BATCH_SIZE) # Decrypt loss for logging/plotting loss = loss.get().float_precision() # get iteration val_i = 1 + epoch * len(trainloader) + iter # append to validation losses for plotting val_losses.append(loss.item()) val_iter.append(val_i) val_acc.append(accuracy) # print progress in validation print("epoch:",epoch+1,f'tLoss: {loss:.2f}(valid)t|tAcc: {accuracy:.2f}%(valid)', val_i) # Log to tensorboard writer.add_scalar('val/loss', loss, val_i) writer.add_scalar('val/acc', accuracy, val_i) breakwriter.close()
Results and Discussion
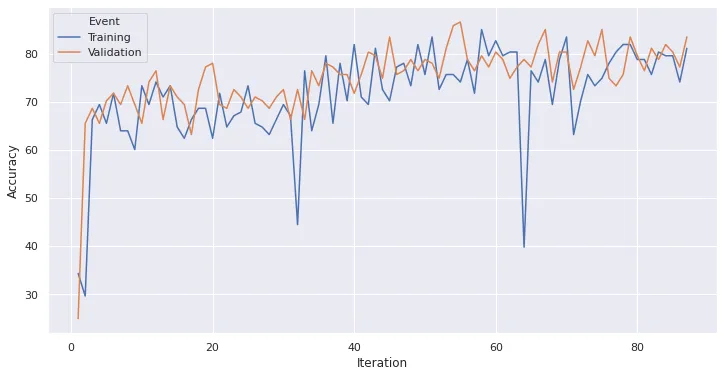
Accuracy
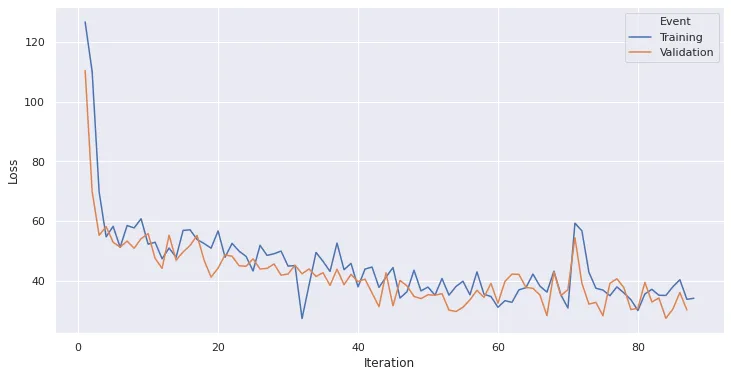
Loss
We can see that the model consistently achieved around 80% validation accuracy while the loss was reduced, but did not tend to cero. This can be attributed to several things, for example, to the use of a MSE optimizer since better optimizers are not yet available for this framework. These results did not improve neither by increasing epoch quantity nor by reducing the learning rate or batch size hyperparameters. We can make the assumption that a different, deeper network architecture (CNN or RNN) could potencially increase the model accuracy while at the same time reducing loss but in turn would escalate training time considerably.
SyferText and PySyft are still in development, therefore, inference and deployment of these models is still not documented and can actually be dangerous if used to protect data in production scenarios. We recommend you to stay tuned to the blog, to StarOpenMined repositories and also to Follow blog authors to stay up-to-date with the latest experiments and implementations.
Congratulations on completing this notebook tutorial! If you enjoyed this and would like to join the movement toward privacy preserving, decentralized ownership of AI and the AI supply chain (data), you can do so in the following ways!
Star PySyft on GitHub
The easiest way to help our community is just by starring the Repos! This helps raise awareness of the cool tools we’re building.
The best way to keep up to date on the latest advancements is to join our community! You can do so by filling out the form at http://slack.openmined.org
Join a Code Project!
The best way to contribute to our community is to become a code contributor! At any time you can go to PySyft GitHub Issues page and filter for “Projects”. This will show you all the top level Tickets giving an overview of what projects you can join! If you don’t want to join a project, but you would like to do a bit of coding, you can also look for more “one off” mini-projects by searching for GitHub issues marked “good first issue”.
If you don’t have time to contribute to our codebase, but would still like to lend support, you can also become a Backer on our Open Collective. All donations go toward our web hosting and other community expenses such as hackathons and meetups!